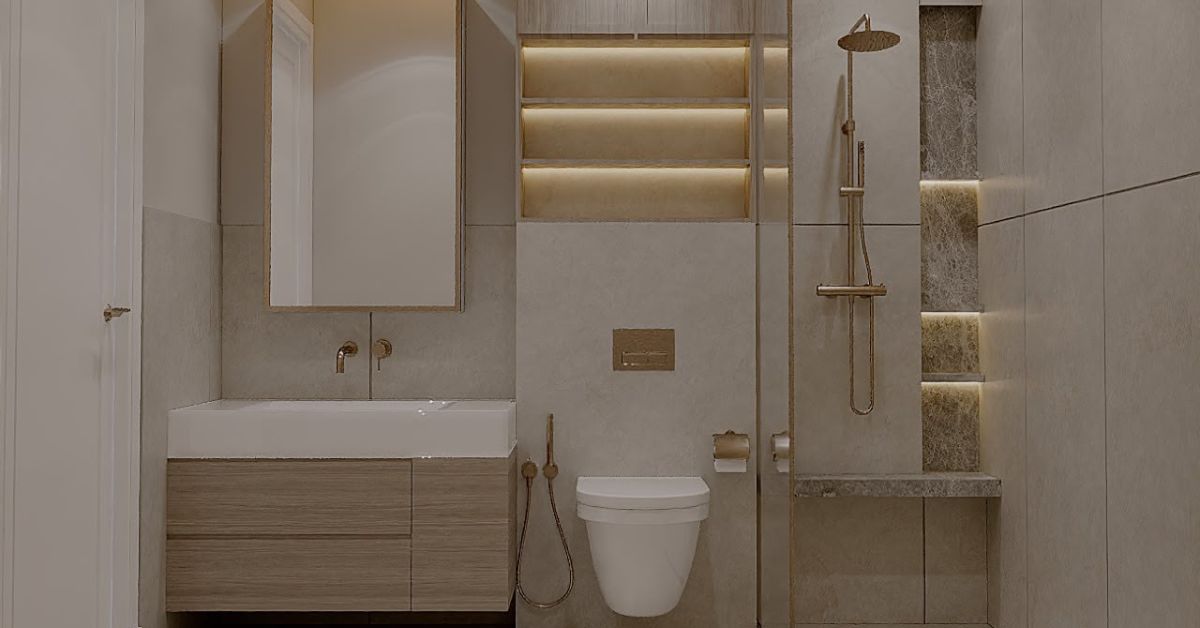
The most effective Small Bathroom Design Ideas in Dubai combine an efficient layout, carefully selected finishes, practical storage and coordinated MEP services to make limited space feel luxurious.
The right Small Bathroom Design Ideas in Dubai can transform a compact bathroom into a comfortable, organised and visually refined space. A small bathroom does not need oversized fixtures or excessive decoration to feel luxurious. It needs proportion, clear circulation, practical storage, suitable lighting and carefully coordinated technical services.
Compact bathrooms are common in apartments, guest rooms and smaller villas across Dubai, Sharjah and the wider UAE. Their limited dimensions can create challenges around fixture placement, shower access, storage, ventilation and moisture control. Even a minor planning mistake can make the room feel congested or difficult to maintain.
The solution is not to fill every available wall with cabinets or use decorative finishes to distract from an inefficient layout. A successful compact bathroom renovation in Dubai begins by understanding how the room is used, what must be stored and which existing plumbing or drainage points can be retained.
This guide explains how to make a small bathroom feel more luxurious through better layouts, walk-in showers, floating vanities, space-saving bathroom storage, mirrors, lighting, materials and coordinated fit-out execution.
Begin With an Accurate Site Assessment
Before choosing tiles, fixtures or vanity finishes, the existing bathroom must be measured and technically reviewed. Compact spaces provide little tolerance for inaccurate dimensions.
The site assessment should identify:
- Wall lengths and ceiling height
- Door and window positions
- Existing water supply and drainage
- Floor levels and slopes
- Electrical and lighting points
- Ventilation or extraction routes
- Columns, ducts and wall projections
- Existing moisture or waterproofing concerns
- Areas that require maintenance access
It is also important to understand what is currently making the bathroom feel small. The problem may be an oversized vanity, a poorly positioned door, a framed shower enclosure or insufficient storage that leaves toiletries visible.
Some compact bathrooms can be improved without relocating every fixture. Retaining suitable plumbing positions while replacing bulky elements may reduce technical complexity and still produce a significant improvement.
AMT Interiors reviews the interior layout and MEP conditions together before developing the design. This helps ensure that the proposed changes are practical for the property.
Define What Luxury Means for the Bathroom
Luxury in a compact bathroom should be based on comfort and quality rather than the number of features included.
A small bathroom feels luxurious when:
- Movement is easy and unobstructed
- The shower contains water effectively
- Lighting supports grooming and relaxation
- Storage keeps the room organised
- Materials feel coordinated
- Fixtures are proportionate to the space
- Ventilation manages moisture
- Drawers and doors operate smoothly
- Finishing details appear clean and deliberate
Adding too many decorative features can make a compact room feel busy. A controlled material palette, clear layout and carefully detailed joinery often create a more refined result than several competing finishes.
For a luxury small bathroom in the UAE, the technical foundation is especially important. Waterproofing, drainage, extraction and electrical coordination must perform correctly before decorative surfaces can deliver lasting value.
Improve the Layout Before Selecting Finishes
An efficient layout is the foundation of every successful small bathroom fit-out. Fixtures should be arranged to preserve movement and provide a clear view into the room.
When possible, avoid placing a bulky vanity or shower enclosure directly in front of the entrance. Keeping the first sightline open can make the room feel deeper.
The layout should be reviewed according to:
- The bathroom door swing
- Clearance around the toilet
- Space in front of the vanity
- Shower entry and glass position
- Drawer and cabinet openings
- Towel access
- Cleaning and maintenance requirements
A layout that appears suitable on a floor plan should also be checked at eye level. Tall partitions, full-height cabinets or heavily framed glass can visually divide the room even when the floor area remains technically accessible.
In some bathrooms, moving a door or changing its opening direction can improve the layout more than relocating plumbing fixtures. Each option should be evaluated according to its impact on the surrounding property.
Use a Wall-Hung Toilet to Reveal More Floor
A wall-hung toilet can create a lighter appearance because the floor continues beneath the bowl. This visible floor area helps a compact bathroom feel less crowded and can simplify cleaning.
The concealed cistern must be coordinated with the wall construction, maintenance access and selected flush plate. The boxing around the cistern can also provide an opportunity for a shallow ledge or storage cabinet.
A wall-hung toilet should not be selected only for appearance. The technical team must assess:
- Wall support and fixing requirements
- Cistern dimensions
- Waste connection position
- Access for future maintenance
- Finished wall depth
- Relationship with nearby fixtures
When the wall depth does not allow a fully concealed installation, a well-designed service wall may still create a clean and integrated result.
The final arrangement should provide comfortable use without reducing the walkway or making the room unnecessarily narrow.
Choose a Floating Vanity
A floating vanity is one of the most effective small bathroom design ideas because it exposes more of the floor and reduces the visual weight of the cabinetry.
The vanity can be designed with drawers, open shelving or a combination of both. Drawers generally provide easier access than deep cabinets, especially when toiletries and grooming items need to remain organised.
A compact vanity should be planned around:
- Basin dimensions
- Water and waste connections
- Drawer clearances
- Mirror width
- Electrical outlets
- Door movement
- Countertop space
- Daily storage needs
The vanity does not need to extend across the entire wall. Leaving a small amount of space around it may make the bathroom feel less confined.
Custom joinery is particularly useful when the room includes an unusual wall angle, column or limited depth. AMT Interiors can develop made-to-measure vanity units through its bespoke joinery and custom woodworking services.
Select the Right Basin
The basin affects countertop space, vanity storage and circulation. An oversized basin can dominate a small bathroom and reduce the area available for grooming items.
Common options include:
- Countertop basins
- Undermount basins
- Integrated basins
- Wall-mounted basins
- Compact corner basins
A countertop basin can create a decorative feature, but it increases the overall height and may reduce usable surface area. An integrated or undermount basin can produce a cleaner appearance and make the countertop easier to wipe.
Wall-mounted basins expose more floor but may provide limited storage. They can work well in guest bathrooms where fewer items need to be stored.
The tap style should be coordinated with the basin. Wall-mounted taps may free countertop space but require accurate plumbing positions before the wall finish is installed.
Replace a Bulky Enclosure With Clear Shower Glass
Clear glass allows the eye to see the entire room rather than stopping at an opaque partition or heavily framed enclosure. This visual continuity can make a compact bathroom feel significantly larger.
A fixed glass panel may be suitable when the shower has enough depth to control splashing. A hinged or sliding glass door may provide better water containment in shallower spaces.
The design should consider:
- Shower depth and width
- Direction of water spray
- Entry position
- Glass support requirements
- Nearby vanity or toilet
- Door clearances
- Cleaning access
- Floor slope and drain position
Frameless or minimally framed glass can create a lighter appearance, but it still requires proper support and accurate installation.
The glass should be planned after floor levels and wall finishes are confirmed. Small measurement errors can affect alignment, water containment and the appearance of joints.
Create a Walk-In Shower Where Practical
A compact walk-in shower can make the bathroom feel more open by reducing thresholds and unnecessary framing.
However, the shower must be technically planned to ensure that water remains within the wet area. A visually open design should not create slippery floors or expose the vanity and door to regular splashing.
The walk-in shower design should coordinate:
- Waterproofing
- Drainage falls
- Floor drain position
- Shower glass
- Mixer and outlet locations
- Recessed storage
- Slip-resistant flooring
- Ventilation
- Towel access
A level or reduced-threshold entry can improve the visual flow of the floor, but it requires precise planning. The substrate must provide enough depth for suitable falls and drainage.
In apartment bathrooms, existing drainage routes and building restrictions may limit major changes. These conditions should be reviewed before the walk-in shower is included in the final design.
Consider Removing an Underused Bathtub
A bathtub occupies substantial floor area. In a bathroom where it is rarely used, replacing it with a well-designed shower may improve movement and create more practical space.
The decision should consider the household’s needs. Families with young children may still require a bathtub, while a private ensuite may function better with a larger shower.
Removing a bath can create space for:
- A wider walk-in shower
- A shower bench
- Better circulation
- Additional storage
- A larger vanity
- Improved accessibility
The existing plumbing and drainage should be assessed before changing the layout. The surrounding floor and walls may also require reconstruction and waterproofing.
The objective should not be to remove a bath simply because walk-in showers are popular. The renovation should reflect how the bathroom will actually be used.
Use Large-Format Materials Carefully
Large-format tiles or marble panels can reduce the number of visible joints, creating a calmer and more continuous appearance.
Fewer grout lines can help a compact bathroom feel less fragmented. However, large materials require careful planning around corners, floor falls, shower niches and fixture openings.
Before installation, the layout should determine:
- Full and cut tile positions
- Joint alignment
- Niche dimensions
- Basin and mirror centre lines
- Shower controls
- Floor drain position
- Material transitions
- Vein direction where applicable
A large tile is not automatically suitable for every shower floor. The required slope and slip resistance must be considered.
Natural marble can add depth and individuality, while porcelain can provide a wide range of consistent finishes. The decision should balance appearance, maintenance and suitability for wet areas.
AMT Interiors coordinates flooring and marble installation with the wider bathroom layout to achieve cleaner joints and transitions.
Continue Materials Across the Room
Using too many different tiles can divide a small bathroom into several visual zones. Continuing one primary material across the floor and selected walls can create a more connected appearance.
The same finish may be used:
- Across the full floor
- From the dry area into the shower
- On the main feature wall
- Behind the vanity
- Around a concealed cistern
- Within selected niches
Continuity does not mean every surface must match. A contrasting vanity, niche backing or metal finish can add depth without making the room feel busy.
When different materials are used, their transitions should align with architectural features rather than ending at arbitrary points.
A controlled palette also makes it easier to coordinate grout, sealant, joinery, glass and sanitary fixtures.
Use Light Colours With Controlled Contrast
Light finishes can reflect more light and make a compact bathroom feel open, but an entirely white room is not the only option.
Warm beige, pale stone, soft grey and light wood finishes can produce a spacious and comfortable atmosphere. Contrast may be introduced through a vanity, tapware, mirror frame or niche.
A balanced palette might include:
- Pale wall and floor finishes
- A warm timber vanity
- One coordinated metal finish
- Clear shower glass
- A slightly darker feature surface
- Soft white lighting
Dark finishes can work in small bathrooms when used selectively. A dark vanity against a light wall may create depth without visually reducing the room.
Samples should be viewed under the bathroom’s actual lighting. Materials that appear warm in daylight can look cooler under artificial illumination.
Use Mirrors to Increase Visual Depth
A large mirror reflects light and creates the impression of additional space. It can also reduce the visual weight of the vanity wall.
The mirror may extend:
- Across the width of the vanity
- From the countertop to the ceiling
- Between two wall finishes
- Across a recessed storage cabinet
- Around integrated lighting
A mirrored cabinet can provide additional storage without adding another visible cabinet face. Its depth should remain proportionate so it does not project uncomfortably over the basin.
Mirror placement should be coordinated with taps, lights, sockets and wall joints. Late changes can create awkward gaps or damage completed surfaces.
Where a full-width mirror is used, the surrounding elements should remain balanced. The basin and lighting do not always need to be centred in the room, but they should relate clearly to the mirror and vanity.
Build a Layered Lighting Plan
Good lighting is essential for making a compact bathroom feel luxurious. One central ceiling light often creates shadows and fails to illuminate the vanity properly.
A layered lighting design can include:
- General ceiling lighting
- Mirror or vanity lighting
- Concealed lighting beneath a floating vanity
- Shower niche lighting
- Decorative wall lights
- Indirect ceiling lighting
Vanity lighting should illuminate the face evenly. Lights positioned only above the mirror may create shadows, while integrated or side lighting can improve visibility.
Soft concealed lighting can add depth and make the room feel more refined during evening use. It should complement rather than replace practical illumination.
Fittings within wet areas must be suitable for their location. Electrical points, drivers and switching should be coordinated before waterproofing, tiling and ceiling work are completed.
Add Space-Saving Bathroom Storage
Visible clutter can make even a well-designed bathroom feel smaller. Effective space-saving bathroom storage should keep everyday items accessible while hiding spare toiletries and cleaning products.
Useful options include:
- Vanity drawers
- Mirrored cabinets
- Recessed shower niches
- Shallow wall cabinets
- Storage above a concealed cistern
- Tall narrow linen units
- Open towel shelves
- Concealed laundry storage
Drawers are generally more accessible than deep cupboards because users can see their contents from above. Internal dividers can organise cosmetics, grooming tools and smaller items.
Storage should be designed around what the household owns. Adding cabinets without reviewing actual requirements may create unnecessary visual weight.
The selected joinery materials, edge sealing and hardware should be suitable for a bathroom environment and regular cleaning.
Use Vertical Space Without Overcrowding the Walls
When floor area is limited, vertical storage can provide useful capacity. However, covering every wall with tall cabinetry may make the bathroom feel narrow.
A full-height unit works best when placed in a less visually dominant area, such as beside the vanity or behind the door. Its depth should be limited so it does not interfere with circulation.
Vertical storage may hold:
- Towels and linen
- Spare toiletries
- Cleaning products
- Grooming appliances
- Laundry supplies
- Toilet paper
Frequently used items should remain at a comfortable level. Less frequently used supplies can be stored higher.
Open sections may reduce the visual weight of a tall cabinet, but they should be used selectively to avoid clutter.
Custom joinery allows the unit to fit around columns, pipes and electrical points while maintaining consistent alignment with the rest of the bathroom.
Add a Recessed Shower Niche
A recessed niche keeps shower products organised without adding baskets or shelves that project into the shower.
The niche dimensions should be coordinated with the tile or marble layout. This helps avoid narrow cuts, misaligned joints and awkward edges.
A niche requires careful waterproofing around:
- Internal corners
- Horizontal surfaces
- Pipe penetrations
- Decorative lighting
- Material junctions
The base should include a slight fall so water does not collect. The niche should also be positioned where it is easy to reach but not directly exposed to the strongest water spray.
One well-proportioned niche usually creates a cleaner result than several small recesses. Its finish may match the wall or use a subtle contrast to create depth.
Reconsider the Bathroom Door
A traditional inward-opening door can consume valuable floor space and interfere with the vanity, toilet or shower entry.
Depending on the property and wall construction, alternatives may include:
- Reversing the opening direction
- Using a sliding door
- Installing a pocket door
- Choosing a folding system
- Adjusting the door position
Every alternative has technical and practical considerations. Sliding doors require wall space, while pocket doors need suitable internal wall construction. Sound control, privacy and locking should also be considered.
The door change should not affect access to switches or nearby furniture outside the bathroom.
Sometimes changing only the door arrangement can create enough additional space for a larger vanity or more comfortable shower entry without relocating major plumbing fixtures.
Keep the Floor Visually Clear
More visible floor area can make a small bathroom feel wider. Floating fixtures, concealed pipework and wall-mounted storage support this effect.
Avoid placing freestanding baskets, open bins and unnecessary accessories across the floor. These items interrupt visual continuity and make cleaning more difficult.
The flooring pattern should also be planned carefully. Highly contrasting borders or multiple changes in material can visually divide the room.
Continuing one suitable surface beneath the vanity and into the shower can create a stronger sense of depth, provided the technical requirements for wet areas are met.
Floor drains, thresholds and material transitions should be positioned deliberately rather than treated as last-minute technical details.
Improve Ventilation and Humidity Control
Effective ventilation is essential in a small bathroom because moisture can build up quickly. Poor extraction may lead to condensation, damaged sealant, odours and deterioration around joinery or painted surfaces.
The ventilation design should consider:
- Room size
- Shower usage
- Existing extraction route
- Grille position
- Ceiling layout
- Airflow beneath or around the door
- Maintenance access
The extraction point should remove moisture effectively without disrupting the lighting or ceiling design.
Joinery should not block ventilation routes. Mirrored cabinets, tall storage and false ceilings must be coordinated with existing ducts and access points.
Ventilation planning should be completed before ceiling and electrical work. Late changes can result in exposed ducts, awkward grille positions or unnecessary modifications to finished surfaces.
Coordinate Plumbing and Drainage Early
Compact bathrooms leave little room for poorly positioned services. Basin waste, shower drainage, toilet connections and concealed mixers must align with the final interior layout.
Before work begins, the technical team should confirm:
- Water supply positions
- Basin and vanity dimensions
- Shower mixer location
- Waste and drainage routes
- Floor levels
- Toilet connection
- Maintenance access
- Water-heating requirements
Moving drainage may be more complex than relocating a visible water connection. Apartment renovations may also be restricted by the existing slab or building services.
Fixtures should be selected before plumbing points are finalised. Changing the basin or shower system after installation can affect the joinery, waterproofing and finished wall surfaces.
Treat Waterproofing as a Core Construction Stage
Luxury finishes cannot protect a bathroom when the waterproofing beneath them is incomplete or poorly coordinated.
Particular attention is required around:
- Shower floors and walls
- Internal corners
- Floor drains
- Pipe penetrations
- Shower niches
- Thresholds
- Wall and floor junctions
- Glass supports
The substrate must be prepared before waterproofing begins. Drainage falls should also be formed correctly so water moves towards the drain.
Water supply and drainage connections should be tested before being concealed. Waterproofed surfaces should be checked before tile or marble installation.
MEP, waterproofing and flooring teams must follow the same coordinated information. Treating each trade separately increases the risk of gaps at important junctions.
Select Suitable Flooring for Wet Areas
Bathroom flooring should provide a balance between appearance, cleaning and slip resistance.
Polished surfaces may look refined but require careful evaluation for shower floors and frequently wet areas. Textured or suitable slip-resistant finishes can improve safety while maintaining the overall design.
The floor material should also accommodate the required slopes. Large-format tiles may be difficult to form around a small point drain without additional cuts. A linear drain may support a different tile arrangement, depending on the existing construction.
The relationship between the dry floor, shower area and threshold must be resolved before installation.
Grout colour can influence the visual continuity of the floor. A closely coordinated tone may create a calmer surface, while highly contrasting grout can make the space appear more divided.
Select One Consistent Metal Finish
Using several unrelated metal finishes can make a compact bathroom feel visually busy. Selecting one main finish creates consistency across taps, shower fittings, handles, glass hardware and accessories.
Possible finishes may include:
- Chrome
- Brushed metal
- Black
- Warm metallic tones
- Other coordinated specialist finishes
Not every item must match perfectly, but the finishes should relate to each other. Samples should be compared together because names such as brushed or satin may vary between product ranges.
The selected finish should also be considered from a maintenance perspective. Water marks, fingerprints and cleaning requirements may differ.
A simple and consistent metal palette helps the vanity, shower and accessories appear as one coordinated design.
Reduce Clutter Through Better Organisation
A luxurious bathroom should remain organised after daily use. This requires more than adding decorative containers to the countertop.
Before designing storage, review:
- Everyday toiletries
- Towels and linen
- Grooming appliances
- Cleaning products
- Spare supplies
- Laundry requirements
Frequently used products can be stored in the top vanity drawers or mirrored cabinet. Spare items may be placed in a taller unit or less accessible drawer.
Electrical grooming tools require safe and practical storage. Where suitable, electrical access may be coordinated inside selected cabinets, subject to technical requirements.
The countertop should retain enough clear space for daily use. When everything has a defined storage location, the bathroom is easier to clean and feels more spacious.
Common Small Bathroom Design Mistakes to Avoid
A frequent mistake is selecting fixtures before confirming the available clearance. A basin, toilet or vanity may fit within the room dimensions but still make circulation uncomfortable.
Other common mistakes include:
- Installing an oversized vanity
- Using heavily framed shower glass
- Providing insufficient storage
- Relying on one ceiling light
- Covering every wall with different materials
- Ignoring drainage feasibility
- Using unsuitable wet-area flooring
- Starting work without coordinated drawings
- Treating waterproofing as a minor task
- Blocking ventilation with cabinets or ceilings
- Misaligning mirrors, lights and basins
- Installing doors that restrict movement
Design, MEP, joinery, flooring and glass details should be coordinated before work begins. Solving conflicts during construction often creates compromises that could have been prevented during planning.
How AMT Interiors Approaches Small Bathroom Fit-Outs
AMT Interiors provides renovation, interior fit-out, MEP engineering, bespoke joinery, flooring, marble installation, glass works, carpentry, painting and interior finishing services across Dubai, Sharjah and the UAE.
The process begins with a site assessment and discussion about how the bathroom is used. Existing dimensions, plumbing, drainage, ventilation, storage and surface conditions are reviewed before the new layout is developed.
Custom vanities, mirrored cabinets and storage units can be planned around verified measurements. MEP services are coordinated with the selected basin, shower, lighting, mirrors and joinery.
Waterproofing, flooring, marble, glass and finishing works are then sequenced according to the approved technical information. Final testing and snagging help confirm that drains, doors, drawers, fixtures, lights and ventilation operate correctly before handover.
This integrated approach is suitable for a compact bathroom renovation in Dubai or a small bathroom fit-out in Sharjah where limited space requires precise coordination.
Frequently Asked Questions About Small Bathroom Design in Dubai
Can a small bathroom feel larger without moving the plumbing?
A compact bathroom can often feel larger without structural changes. The most effective improvements usually come from better fixture placement, a floating vanity, clear shower glass, larger mirrors and a consistent material palette. Replacing bulky storage with custom wall-mounted joinery can also free visible floor area. Before recommending changes, AMT Interiors reviews the room dimensions, door swing, plumbing points, ventilation and circulation. Some layouts can be improved by changing only the vanity or shower enclosure, while others may benefit from relocating selected fixtures. The objective is to create clearer movement and better storage without introducing unnecessary technical work or avoidable disruption.
Is a walk-in shower suitable for a compact bathroom?
A walk-in shower can work well in a small bathroom when the shower area is deep enough to control splashing and the floor falls are planned correctly. A fixed glass panel often creates a more open appearance than a framed enclosure, but it must still protect the vanity, door and dry zone. Drain position, waterproofing, ventilation and glass dimensions should be coordinated before tiling begins. In Dubai apartments, existing drainage routes and building rules may limit how far the shower can be moved. AMT Interiors reviews these conditions early and develops a practical shower layout that balances openness, safety, maintenance and available space.
Are light colours always best for a small bathroom?
Light colours can help a compact bathroom feel brighter, but an entirely white room is not the only solution. Warm neutrals, pale stone, soft grey and light wood tones can create a spacious appearance while adding depth. Darker finishes may be used selectively on a vanity, niche or metal detail to create contrast without visually shrinking the room. The result also depends on mirror size, lighting, joint placement and the amount of visible floor area. AMT Interiors reviews material samples under the property’s actual lighting so homeowners in Dubai and Sharjah can choose a balanced palette that remains practical to clean and maintain.
How can storage be added without overcrowding the bathroom?
Useful storage can be added without making a small bathroom feel crowded by using vertical and recessed areas. A floating vanity with drawers is usually more accessible than a deep cabinet with doors. A mirrored cabinet can combine reflection and storage, while a shower niche keeps bottles away from the floor. Other options include a tall narrow linen unit, storage above a concealed cistern and shallow wall cabinets. Custom joinery allows these elements to fit the exact room dimensions. AMT Interiors coordinates storage with plumbing, electrical points, ventilation and door clearances so the bathroom remains organised without blocking movement or making the walls feel heavy.
Does a small bathroom renovation require building approval?
Some bathroom renovations require building or community approval, especially when the work involves plumbing relocation, drainage changes, wall alterations, ventilation or common services. Requirements vary between properties, so the proposed scope should be reviewed before demolition begins. Apartment buildings may also control contractor access, delivery timings, lift protection and working hours. AMT Interiors can help prepare the technical information needed for the renovation and plan execution around the applicable site rules. Confirming permissions early reduces the risk of delays, stop-work instructions or redesign after fixtures and finishes have been selected for a small bathroom renovation in Dubai or Sharjah homes.
Can AMT Interiors manage the entire small bathroom fit-out?
AMT Interiors can coordinate the connected services required for a complete small bathroom renovation, including layout planning, MEP engineering, custom vanity joinery, carpentry, flooring, marble installation, painting, glass and interior finishing. Managing these activities through one project team helps align the basin, shower, drainage, lighting, mirrors, storage and floor levels. The process begins with a site assessment, followed by technical coordination, material approval, controlled execution and final snagging. This integrated approach is useful for compact bathrooms in Dubai, Sharjah and across the UAE because limited space leaves little room for errors between trades or last-minute changes to completed surfaces overall.
Make Your Small Bathroom Feel Luxurious With AMT Interiors
A compact bathroom can feel spacious and refined when its layout, fixtures, storage, lighting and materials are planned as one connected design. Floating vanities, clear shower glass, large mirrors, recessed storage and consistent finishes can improve the visual space, while coordinated MEP, waterproofing and ventilation protect its long-term functionality.
The most effective small bathroom design ideas in Dubai are based on accurate measurements and the household’s real requirements rather than adding unnecessary features.
Book an appointment with AMT Interiors to discuss your small bathroom renovation or interior fit-out in Dubai, Sharjah or elsewhere in the UAE.